The Crucible Engine: Architecting a Logic-Aware 3D Configurator
How I built a 3D PC builder that doesn't just look cool—it understands hardware engineering. A deep dive into synchronizing React Three Fiber state with complex business logic using Zustand and TypeScript.
Most web-based 3D configurators are just "Product Viewers" with a carousel. They let you swap colors or textures, but they don't understand the physical or electrical constraints of the objects they are rendering.
For BASE 60, a high-end hardware foundry, I needed to build something different. I needed a system that wouldn't just let you put a CPU on a motherboard—it needed to know if that CPU physically fit the socket, if the Power Supply (PSU) could handle the wattage, and if the GPU was physically too long for the case.
I call this system The Crucible Engine. Here is how I architected the bridge between 3D visuals and strict business logic.
The Challenge: Spatial vs. Logical State
In 3D development, it is tempting to stuff logic inside the 3D components.
- Bad Pattern: The
<Motherboard>component checks if it has a CPU. - The Problem: What if the HUD (2D UI) needs to show the price? What if the Checkout system needs the weight? If the logic is trapped inside the Canvas, the rest of the app is blind.
I needed to decouple the Brain (Logic), the Rules (Validation), and the Body (3D Rendering).
Part 1: The Brain (Zustand Manifest)
I chose Zustand for state management because it lives outside the React Component tree, making it accessible to both the DOM (UI) and the WebGL Canvas (R3F) without prop drilling.
Instead of an array of items, I structured the "Manifest" (Cart) as a strictly typed Record. This gives us O(1) access time—essential when running logic checks on every render frame.
typescript// The heart of the applicationexport type BuildComponentType = "CPU" | "GPU" | "PSU" | "MOTHERBOARD" | "RAM" | "CHASSIS" | "STORAGE1" | "STORAGE2" | "COOLER";// O(1) Lookup Tabletype BuildManifest = Record<BuildComponentType, ProductBuilderDTO | null>;export const useBuilderStore = create<BuilderState>((set) => ({ currentStep: 0, manifest: { CPU: null, GPU: null, PSU: null, ... }, // The atomic update action setComponent: (type, product) => set((state) => ({ manifest: { ...state.manifest, [type]: product } })),}));
Part 2: The Rules (The Logic Engine)
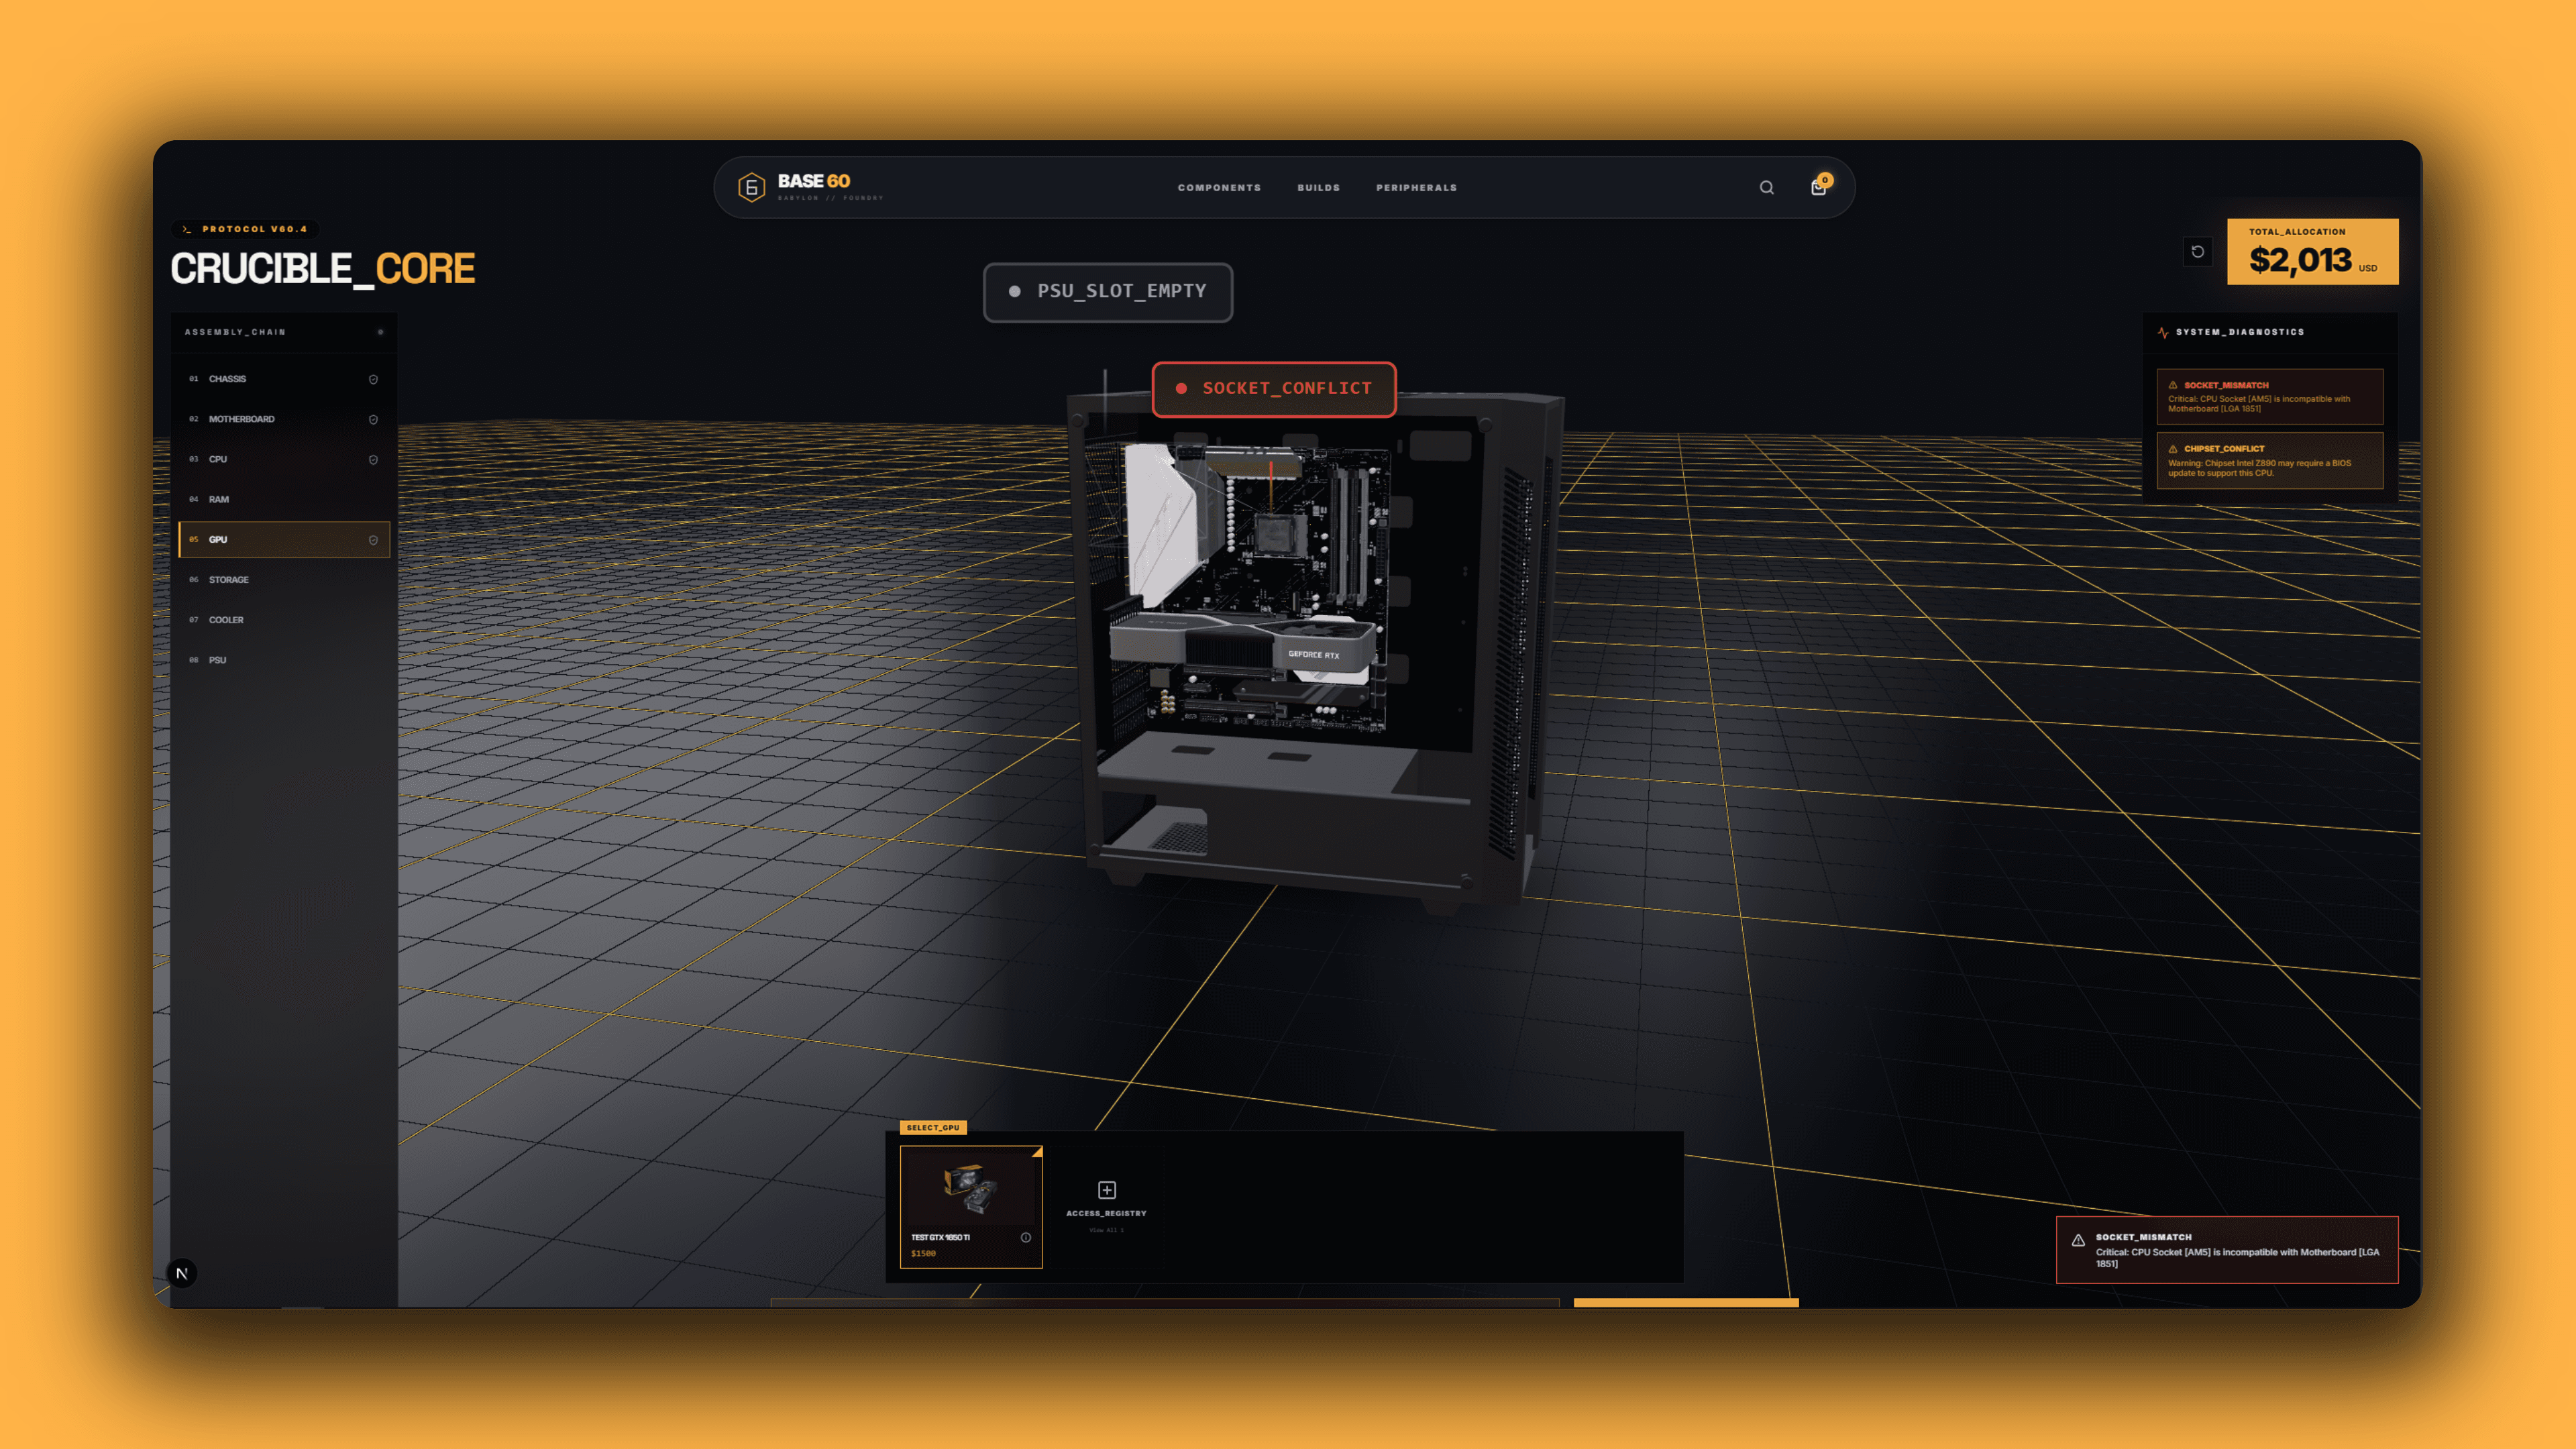
This is where the app moves from "Toy" to "Tool." I created a pure function called resolveCompatibility. It runs whenever the store updates, returning a diagnostic report of Protocol Alerts.
It handles complex cross-component validation:
- Socket Handshake: Checks if CPU Socket matches Motherboard Socket.
- Wattage Calculation: Sums TDP of all parts and warns if it exceeds 80% of PSU capacity.
- Physical Clearance: Checks if the GPU length (mm) exceeds the Case's max clearance.
typescriptexport function resolveCompatibility(manifest: BuildManifest): ProtocolAlert[] { const alerts: ProtocolAlert[] = []; const { CPU, MOTHERBOARD, PSU, GPU } = manifest; // 1. Socket Check if (CPU && MOTHERBOARD) { if (CPU.compatibility.socket !== MOTHERBOARD.compatibility.socket) { alerts.push({ code: "SOCKET_MISMATCH", message: `Critical: CPU [${CPU.name}] does not fit Board [${MOTHERBOARD.name}]`, severity: "CRITICAL", }); } } // 2. Power Simulation if (PSU) { const totalLoad = (CPU?.tdp || 0) + (GPU?.tdp || 0) + 100; // +100W Overhead if (totalLoad > PSU.wattage) { alerts.push({ code: "ENERGY_FAILURE", message: `System Draw (${totalLoad}W) exceeds PSU (${PSU.wattage}W).`, severity: "CRITICAL", }); } } return alerts;}
By keeping this logic pure, I can unit test the "Compatibility Engine" without ever loading a 3D model.
Part 3: The Body (Augmented Reality Assembly)
For the visual layer, I used React Three Fiber. But simply loading models wasn't enough. I needed them to snap together perfectly.
I created a Coordinate Registry (FOUNDRY_ANCHORS). This acts as a map for every chassis and motherboard in the database, defining exactly where child components should "dock."
typescriptexport const FOUNDRY_ANCHORS = { "chassis-onyx": { mb_dock: [0, 0.05, -0.1], // Where the mobo screws in psu_dock: [0, -0.4, -0.1], }, "board-z790": { cpu_socket: [0, 0.1, 0.02], // Where the CPU sits gpu_slot: [0, -0.1, 0.1], },};
Inside the 3D Scene, I utilized Composition. The CPU is rendered as a child of the Motherboard, which is a child of the Chassis. This means if I rotate the Case, the entire system rotates with it physically.
The "Iron Man" Exploded View
To let users see inside the build, I implemented an "Exploded View" toggle. I used GSAP for the animation because of its precision over standard CSS transitions.
We calculate an "Explosion Vector" for each part. When active, the Motherboard slides left (x: -0.5), the GPU slides out (z: +0.2), and the RAM floats up (y: +0.1).
tsx// Inside PartModel.tsxuseEffect(() => { if (groupRef.current) { // Calculate target based on "Exploded" state const targetPos = isExploded ? [ originalPos[0] + offset[0], originalPos[1] + offset[1], originalPos[2] + offset[2], ] : originalPos; gsap.to(groupRef.current.position, { x: targetPos[0], y: targetPos[1], z: targetPos[2], duration: 0.8, ease: "power3.inOut", }); }}, [isExploded]);
Performance at Scale
Rendering high-fidelity hardware in the browser is heavy. To ensure 60 FPS performance:
- Draco Compression: All models are compressed via a glTF pipeline, reducing 50MB files to ~2MB.
- Memoization: The logic engine uses
useMemoto prevent re-calculating compatibility on every frame. - Adaptive DPR: The canvas monitors the device's frame rate and automatically lowers the pixel ratio on weaker devices to maintain fluidity.
The Result
The result is Crucible, a configurator that feels less like a shopping cart and more like an engineering terminal. It guides the user, prevents costly compatibility mistakes, and provides a tactile, "gamified" building experience—all within the browser.

Ali Lefta
Engineering precision meets software architecture.